
How to Add a Button to a Thank You Page in Systeme.io (Beginner Tutorial)
-
🛠️What you’ll need
-
📂Step 1: Open Your Thank You Page
-
➕Step 2: Add a Button Element
-
🎨Step 3: Customize the Button
-
🔗Step 4: Add a Link to Your Button
-
👀Step 5: Preview Your Page and Test Your Button
Disclosure: Some links in this article may be affiliate links, which means I may earn a commission at no extra cost to you if you choose to purchase through them. I only recommend tools I believe are genuinely useful, especially for beginners.
In this tutorial, you’ll learn how to add a button to a Thank You page in Systeme.io.
In most cases, this button sends visitors to an affiliate offer, sales page, or another resource after they reach your Thank You page.
If you haven’t created your Thank You page yet, check out my tutorial on how to create a Thank You page in Systeme.io first.
If you don't already have a Systeme.io account, you can create one here.
🛠️What you’ll need
A Thank You page created in Systeme.io
📂Step 1: Open Your Thank You Page
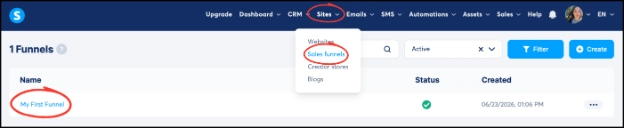
Go to Sites → Sales Funnels.
Open the funnel you want to edit.
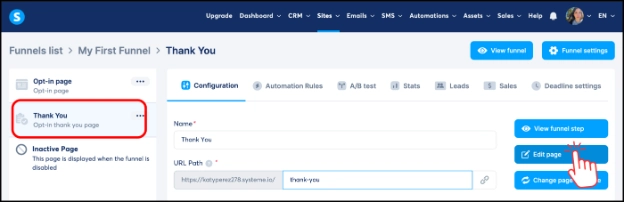
On the left side, make sure the Thank You page is selected.
Click Edit Page.
➕Step 2: Add a Button Element
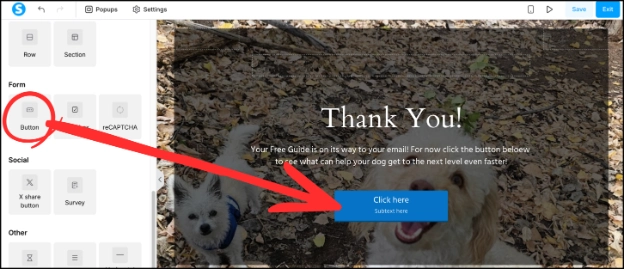
In the left-side toolbar under Elements, scroll down until you see Form.
Under Form, drag a Button onto your Thank You page. You can place it on any of the dotted lines.
🎨Step 3: Customize the Button
Click the Button. In the left-side toolbar, scroll down until you see Typography.
Change the button text to whatever you’d like it to say. You can also change the font size, font style, and subtext. To remove the small text below the button, simply delete the subtext.
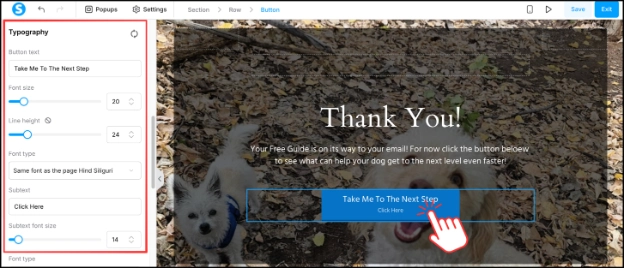
Scroll down to the Color section to change the button color and text color.
You can also customize other settings, such as the border, shadow, and button effects.
💡Tip:
You don’t have to customize every setting. A simple button with clear text works just fine.
🔗Step 4: Add a Link to Your Button
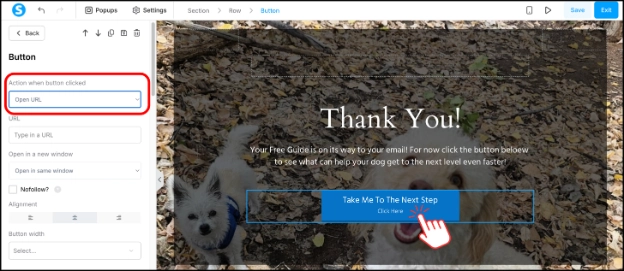
Click the Button. In the left-side toolbar under Button, find Action when button clicked and select Open URL.
Under URL, paste the link you want visitors to open after clicking the button. This could be an affiliate offer, sales page, another funnel page, or any other URL.
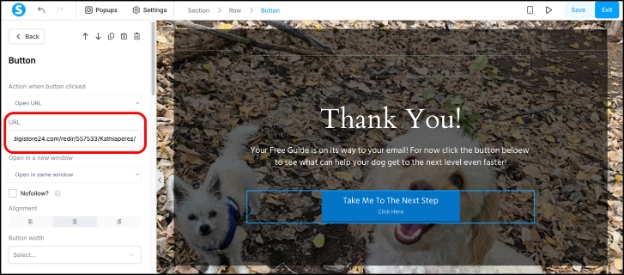
Under Open in a new window, choose whether you want the link to open in the same window or a new window.
💡Tip:
If you’re linking to an affiliate offer or another website, consider opening the link in a new window so visitors don't lose your Thank You page.
👀Step 5: Preview Your Page and Test Your Button
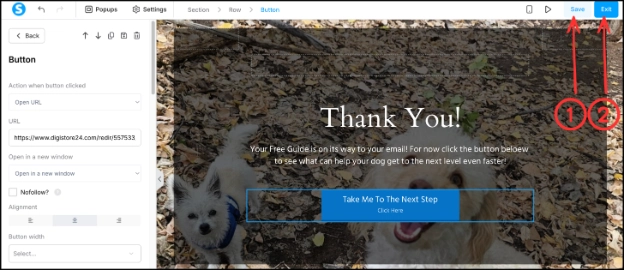
In the top-right corner of the funnel editor, click Save and Exit.
Make sure the Thank You page is selected, then click View Funnel Step.
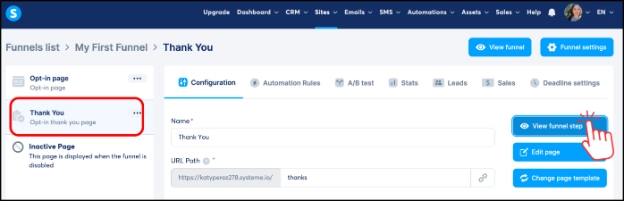
Click the button to make sure it opens the URL you linked it to.
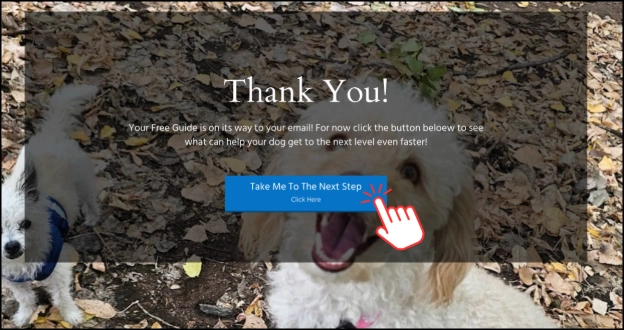
After clicking the button, you should be taken to the page or offer you linked.
That’s it! You’ve successfully added a button to your Thank You page in Systeme.io.
Your visitors can now click it to reach your chosen offer, sales page, or resource.
Continue Learning Systeme.io
If you’re just getting started with Systeme.io, these beginner tutorials may help:
How to Create a Funnel in Systeme.io – Learn how to create your first funnel using a pre-made template.
How to Edit a Funnel Page in Systeme.io – Learn how to customize your funnel’s design, text, images, and buttons.
How to Create an Opt-in Form in Systeme.io – Learn how to collect email addresses with a simple opt-in form.
How to Create a Thank you Page in Systeme.io - Learn how to create a simple thank you page after someone opts in.
How to Add and Verify a Sender Email Address in Systeme.io - Learn how to add and verify a sender email address so you can start sending emails in Systeme.io.
-
🛠️What you’ll need
-
📂Step 1: Open Your Thank You Page
-
➕Step 2: Add a Button Element
-
🎨Step 3: Customize the Button
-
🔗Step 4: Add a Link to Your Button
-
👀Step 5: Preview Your Page and Test Your Button
Disclosure: Some links in this article may be affiliate links, which means I may earn a commission at no extra cost to you if you choose to purchase through them. I only recommend tools I believe are genuinely useful, especially for beginners.