
How to Add and Verify a Sender Email Address in Systeme.io (Beginner Tutorial)
-
🛠️What You’ll Need
-
⚙️Step 1: Go to Your Email Settings
-
➕Step 2: Add Your Email Address
-
📩Step 3: Verify Your Email Address
-
✅Step 4: Make Sure Your Email Is Verified
Disclosure: Some links in this article may be affiliate links, which means I may earn a commission at no extra cost to you if you choose to purchase through them. I only recommend tools I believe are genuinely useful, especially for beginners.
In this tutorial, we’ll add and verify your sender email address so you can start sending emails through a workflow in Systeme.io.
If you don't already have a Systeme.io account, you can create one here.
🛠️What You’ll Need
An Outlook, Hotmail, or Live email address
For the sake of this tutorial, I’ll be using a Live email address as my sender.
While Systeme.io currently allows certain Microsoft email addresses, including Outlook, Hotmail, and Live, they strongly advise against using them because they can cause deliverability issues, meaning your emails are less likely to reach your subscribers.
For better email deliverability, Systeme.io recommends using a professional email address connected to your own domain.
⚙️Step 1: Go to Your Email Settings
Hover over your profile photo in the top-right corner, then click Settings from the drop-down menu.
In the left-hand menu, click Emails.
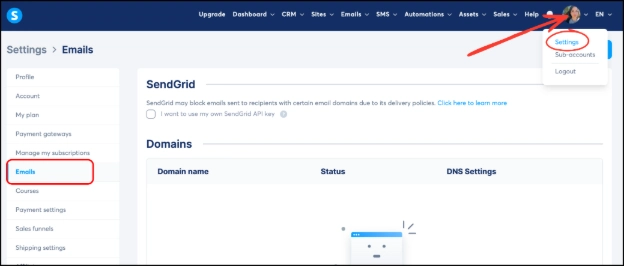
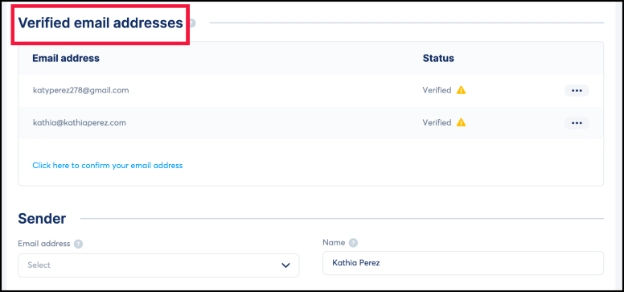
Scroll down until you see Verified Email Addresses.
➕Step 2: Add Your Email Address
Under Verified Email Addresses, click the blue link that says “Click here to confirm your email address.”
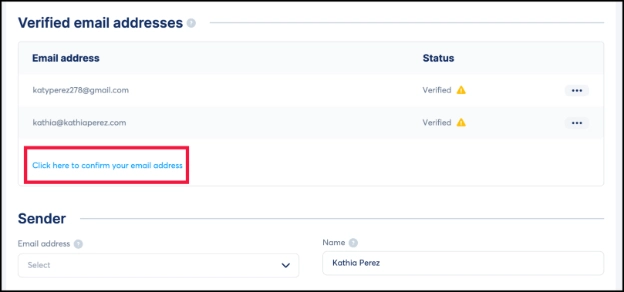
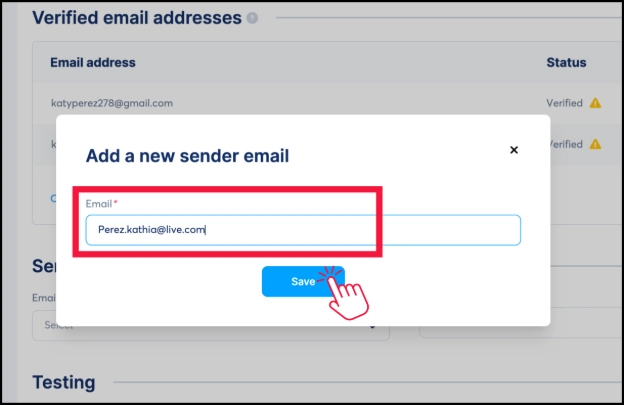
Enter the sender email address you want to use and click Save.
📩Step 3: Verify Your Email Address
Go to the inbox of the sender email address you just added.
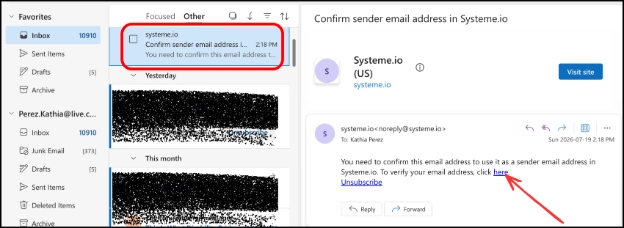
Open the confirmation email you received from Systeme.io.
Click the "here" link inside the email to confirm your email address.
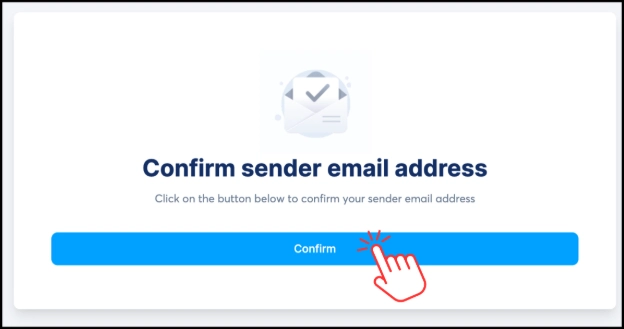
You’ll be redirected to a confirmation page. Simply click Confirm.
✅Step 4: Make Sure Your Email Is Verified
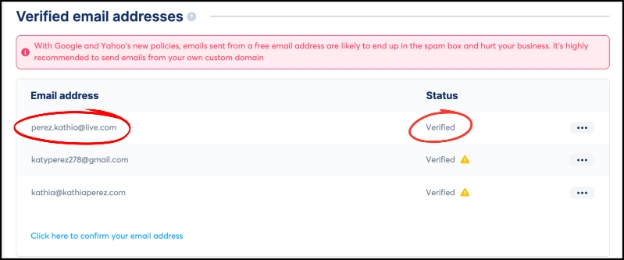
Go back to your email settings. Your email address should now have a Verified status.
📝Note:
As mentioned earlier, a custom domain email is recommended for better deliverability.
You’re now ready to use this email address as a sender for your workflows, campaigns, or newsletters.
Continue Learning Systeme.io
If you’re just getting started with Systeme.io, these beginner tutorials may help:
How to Create a Funnel in Systeme.io – Learn how to create your first funnel using a pre-made template.
How to Edit a Funnel Page in Systeme.io – Learn how to customize your funnel’s design, text, images, and buttons.
How to Create an Opt-in Form in Systeme.io – Learn how to collect email addresses with a simple opt-in form.
How to Create a Thank you Page in Systeme.io - Learn how to create a simple thank you page after someone opts in.
How to Add a Button to a Thank you Page in Systeme.io - Learn how to add a button, customize it, and link it to an affiliate offer, sales page or another URL.
-
🛠️What You’ll Need
-
⚙️Step 1: Go to Your Email Settings
-
➕Step 2: Add Your Email Address
-
📩Step 3: Verify Your Email Address
-
✅Step 4: Make Sure Your Email Is Verified
Disclosure: Some links in this article may be affiliate links, which means I may earn a commission at no extra cost to you if you choose to purchase through them. I only recommend tools I believe are genuinely useful, especially for beginners.